
Skull Makeup: How I Created This Classic Halloween Look
Table of Contents
When it comes to Halloween, I always end up going back to skull makeup. It’s one of those looks that just works—bold, dramatic, and you know exactly what you’re looking at the second you see it. This one came together step by step, and I’ll walk you through exactly how I did it.
Getting Started: Prepping the Brows and Outline
The first thing I did was get my brows out of the way. I used a bit of FX wax, smoothed it down into the hairs, and pressed everything flat so I’d have a clean surface to paint on. After that, I took a white pencil and quickly mapped out the skull—eye sockets, the nose shape, jawline, and all the teeth. It doesn’t have to be perfect at this stage; it’s just a guide.
Building the Bone Base
I didn’t go with pure white because it can look too stark and flat. Instead, I mixed white with a bit of beige face paint to get more of a bone color. I brushed on the first layer, then went over it with a sponge, stippling to even it out. That gets rid of streaks and gives it that slightly textured, “bone-like” finish. Once it dried, I added a second coat to make it fully opaque.
Filling in the Hollow Parts
Next up was all the dark areas: the eyes, nose, temples, and the space under the cheekbones. I used black face paint and filled in the sockets first—they’re the biggest areas, so it made sense to get them done before I smudged anything accidentally. I painted the nose cavity in a triangular shape and deepened the hollows along the jaw.
At this point, the design started to feel more like a skull. The contrast between the “bone” areas and the black shadows really pulled the shape together.
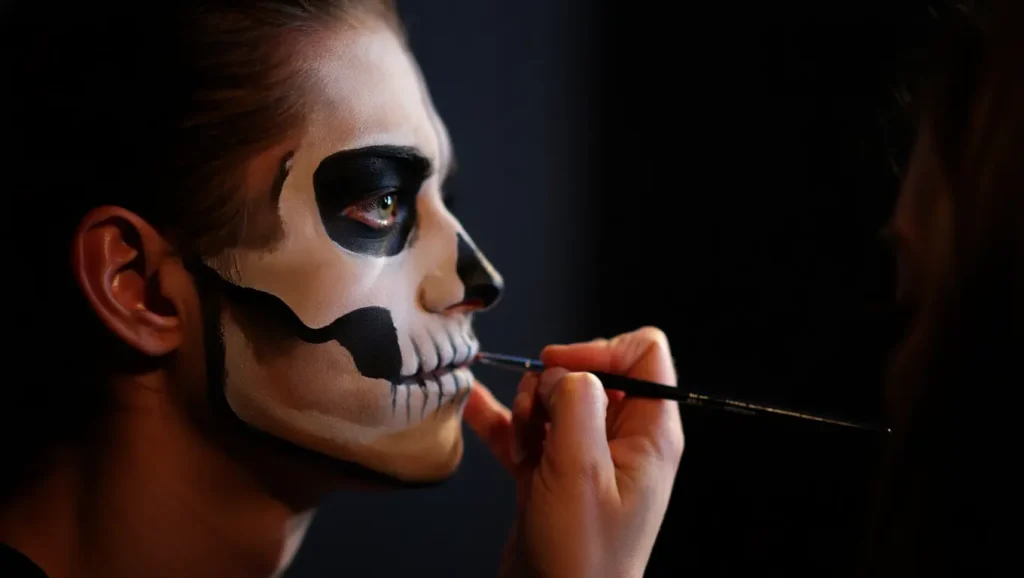
Teeth: The Trickiest Part
The teeth always take the most patience. I painted black lines across my lips and out toward the cheeks to create that wide skeletal grin. Each tooth got outlined individually and then shaded to give them depth. I added thin white highlights to make them pop a bit more. Extending the teeth further back toward the cheeks makes them visible even when the mouth is closed, which I think makes the whole thing more convincing.
Adding Depth with Shading
Flat paint can look a little cartoonish, so I went in with a fluffy brush and a bit of black eyeshadow. I shaded around the temples, brow bone, and the edges of the jaw and nose. It’s a subtle step, but it really makes the skull feel like it has dimension instead of just sitting on top of your face. I also softened the borders where the black met the “bone” color so everything blended together.
Cracks and Details
To make it look less clean and more realistic, I painted a few thin cracks across the skull. They’re not symmetrical—I kept them random, with soft shading around the lines so they stand out. Those little details give the whole look more personality.
Extending the Look
I didn’t stop at the jaw. I dragged the design down my neck with quick strokes of white and black paint to mimic vertebrae. They don’t have to be exact; once you add a wig or costume, they just add to the effect.
Skull Makeup The Final Touches
For accessories, I added a rose crown for a splash of color and threw on a wig to hide my hair. After a few touch-ups—mostly re-darkening the eye sockets and cleaning up the teeth—I was done. The transformation felt complete: a dramatic, detailed skull makeup look that reads instantly, even from across the room.
What Makes Skull Makeup Work
It’s all about the contrast. The creamy “bone” color next to the deep blacks, the careful shading, and those crisp teeth lines make the whole thing pop. It’s simple in theory but leaves a big impact.
Skull Makeup: Final Thoughts
If you’re looking for a look that’s equal parts classic and dramatic, skull makeup is it. With a few paints, a couple of brushes, and some patience, you can turn your face into something striking and unforgettable. I always come back to it because it never fails—it’s timeless Halloween done right.